As We all know that During Formatting a Computer After the File Copying is Completed then windows Require 39 Minutes Time. We can bypass this time by a simple trick.
It will just take around 9 minutes and 2 minutes for Tolerance(depends System to system).
Install Windows in 10 mins:-
=======================
1) Wait till the copy part is over, when its over system reboots and the below image will appear.
2) Now As This Image APPEARS You Have to Press "Shift + F10 ". This Will Open The command Prompt. Now type "taskmgr" in it to open the Task manager.
3) After The task Manager Opens go to Processes tab and find "Setup.exe" process and Right CLICK on it and set the Priority to Highest.
4) Now just wait and watch your xp install in 10 mins !
SUBSCRIBE TO SMS UPDATES


Showing posts with label ZEAL. Show all posts
How to Join Powerpoint Files Instantly
Posted by avnrurfriend in EXAM TIPS, TECHNO NEWS, ZEAL on Saturday, January 29, 2011

An easy way to store away multiple presentation files from a conference or event is simply to merge them all into one single Powerpoint file. That way you:
- Reduce clutter in your folders
- Don’t have to wonder which was the one-of-20-presentations you were looking for
No, you don’t have to copy and paste slides from each presentation. Just use Powerpoint Joiner, and it will run a script which will take care of all the merging of files with just a few clicks.
Also useful if you have to regularly compile a standard set of Powerpoint files from various sources.

Do you like Powerpoint? Tell us in the comments!
8 Ways to Permanently Delete Data Without Leaving ANY Trace
Posted by avnrurfriend in TECHNO NEWS, ZEAL

When you delete a file, and clear out your desktop ‘recycle bin’, the data isn’t really gone – you essentially just ‘hide’ it, and tell the system that it’s OK to write over the data. This of course means that it’s possible in many cases to retrieve the ‘permanently deleted’ data using a variety of free tools. If you’re looking for a proper solution to wipe away those confidential files without hope of recovery, here are 8 FREE tools you can try.
1. How to permanently delete files with a simple click
DeleteOnClick is a very simple to use program that securely deletes files so they cannot be undeleted or recovered. It’s implemented as a Windows Explorer extension so you just need to right-click on the files then choose Securely Delete to wipe the files. DeleteOnClick completely deletes files in one click rather than sending the file to the recycle bin.
2. How to shred files on the Mac
Beginning with Mac OS 10.3, Apple enhanced its security by introducing the Secure Empty Trash feature, which follows the U.S. government’s pattern of overwriting data seven times.
Permanent Eraser provides an even stronger level of security by implementing the Gutmann Method. This utility overwrites your data thirty-five times, scrambles the original file name, and truncates the file size to nothing before Permanent Eraser finally unlinks it from the system. Once your data has been erased, it can no longer be read through traditional means.
3. How to wipe out data by overwriting it again and again
Heidi Eraser is an advanced security tool (for Windows), which allows you to completely remove sensitive data from your hard drive by overwriting it several times with carefully selected patterns. Think of it as a PC version of Permanent Eraser for the Mac.
4. How to shred files on Linux
If you’re using Linux, you have several command line options revolving around the ‘Shred’ command and Secure-Delete tools.
5. How to wipe out an entire hard disk
Darik’s Boot and Nuke ("DBAN") is a self-contained boot disk that securely wipes the hard disks of most computers. DBAN will automatically and completely delete the contents of any hard disk that it can detect, which makes it an appropriate utility for bulk or emergency data destruction.
DBAN is a means of ensuring due diligence in computer recycling, a way of preventing identity theft if you want to sell a computer, and a good way to totally clean a Microsoft Windows installation of viruses and spyware. DBAN prevents or thoroughly hinders all known techniques of hard disk forensic analysis.

6. How to wipe away your tracks on a PC
Web browsers can leave behind a telling trail. Delete History Free gets rid of everything from Internet browsing history, recent documents history, recycle bins, temp folders and more.
7. How to encrypt then destroy files
Secure Delete works by getting files removed in such a way that even if the file can be recovered, the content is nonsense, and cannot be decrypted. It does so by allowing you to specify a directory in which all files should be deleted. When each file is deleted the contents of the file are filled with random data prior to deleting the file.
8. How to pick your shredding options
Want more options? In File Shredder you can choose between 5 different shredding algorithms, all differing in speed and strength of shredding.
Which one is best? This can be debatable, and even standards of security vary from country to country. As a guideline, US Department of Defense standards require overwriting files at least 7 times before it’s deemed securely deleted. I guess if it’s good enough for them to wipe out classified documents, it should in theory – be good enough for the rest of us.
Did I miss out your favorite digital shredder? Tell us in the comments!
How Secure Is Your Password?
Posted by avnrurfriend in ZEAL on Friday, December 3, 2010
It has become very easy for the hackers to hack your password.
Do u know how secure and strong ur password is?
Now-a-days using advanced algorithms developed it is very easy to hack your password within hours. Hours is not a big time. Expect ur password is hacked and the hacker is logged into ur account and been playing with ur account. He can even get u caught to the police doing some disguisting things with ur account.
So its very important to secure ur password. It is easy only when ur password is strong.
Check how strong is ur password here

How to choose a good and strong password.
- Use at least eight characters.
- Use number and special characters like , . / ] [. This is the best thing which makes ur password very much stronger.
- Don't use a word found in a dictionary, English or foreign.
And latest browsers come with an option to save ur password for further simpler log ins. Don't do it.
Tag Scanner - The Best
Posted by avnrurfriend in ZEAL

U can easily edit the albums, artist names of all the files very easily. This is helpful when u load ur songs into ur ipod or mp3 player.
In ipod normally u wont get all the songs of single album in single folder,
With this software u can edit such that all the songs of one album are arranged in a single folder when the album name and artist name of all the songs of a same movie are same. U can do it easily using Tag scanner


How To Download Facebook or Youtube Videos Without Any Tools
Posted by avnrurfriend in ZEAL
Have you ever liked a video shared by your friend on facebook and wanted to download it…Well this this tutorial is not only for facebook or youtube instead it can be used for any video streaming website like metacafe,dailymotion,veoh or yahoo videos.There are websites on the internet that will convert your video link into a download link but it has the following drawback
- If you already watched the whole video and then you decide to download it to your computer it will take double time becuase you already have spent time watching it and now have to spend time downloading it to your hardrive.
- Moreover, the download speeds are very slow and its very irritating to download the whole video again.
But if you have already played the whole video on the site then there is no need to waste the time on downloading it again.We simply have to locate the cache folder of the browser as when the video is streamed it is automatically saved in the cache folder and just have to copy paste the video file from cache folder to your desired location in your computer.
Here is the step by step tutorial with screenshots on how you can locate the cache folder for various browsers in various operating systems
Case 1:Google Chrome
For windows Vista and Windows 7
If you use google chrome in windows vista or windows 7 then here is the location of the cache folder
C:\Users\USER_NAME\AppData\Local\Google\Chrome\UserData\Default\Cache
C, being the system root. If you are not sure about the system root you can replace C: with %systemroot%.
Also donot forget to replace USER_NAME to your windows username
For Windows Xp Users
In windows Xp the google chrome cache folder can be found at
C:\Documents and Settings\USER_NAME\Local Settings\Application Data\Google\Chrome
CASE 2:Mozilla Firefox
For Windows 7 and Windows Vista
The temporary cache folder can be located at
C:\Users\USER_NAME \AppData\Roaming\Mozilla\Firefox\Profiles
For Window Xp Users
The temporary cache folder can be located at
C:\Documents and Settings\USER_NAME \Local Settings\Application Data
CASE 3:Internet Explorer
In case of Internet Explorer you need to go to Tools>Internet Options and then in Genreal tab click on Settings button

A new window will popup in front of you now click on View Files button.

How To Find Your Video In Cache Folder
Once you have found the cache folder of your browser the next thing you have to do is locate your video file.To do this arrange the files of the folder according to their size because video files are usually large in size.Open the largest files with Vlc player.Once you have found your video just copy it to your desired location.
Note:There are usually Some data files with names like data_1 in cache folder.Donot open them with Vlc open the rest of the files with Vlc and you will easily find your video.
Note:Make sure that you replace the USER_NAME with your windows username in the above addresses
Install XP in 10 Minutes
Posted by avnrurfriend in ZEAL
How Parents Can Protect Their Kids from Inappropriate Content on the Internet
Posted by avnrurfriend in ZEAL on Saturday, June 26, 2010
The Internet hosts billions of web pages but a large chunk of this material may be inappropriate for your young children. Therefore, let’s explore a couple of easy ways that can possibly help parents prevent kids from viewing the dark side of the world wide web.
You don’t have be a tech-savvy person to implement any of the following stuff on your home computer(s) and all the software tools / services discussed here are available for free via the Internet.
Block Adult Sites Automatically
Since you don’t want kids to accidentally see any of sites that contain adult content, an easy option for blocking such sites is OpenDNS.
You don’t have to download or install any software – just go to opendns.com/start in any Internet browser, choose the "Computer" option (let’s keep it simple) and follow the instructions on the screen. Once your computer is configured with OpenDNS, go to Dashboard -> Settings and set the Filtering level to either Moderate or High.
Now whenever your kid mistakenly types a URL of some adult site in the browser (e.g. whitehouse.com instead of whitehouse.gov) or clicks a link that may be pointing to an inappropriate site, the OpenDNS filters will match the address of that site against their own database of adults sites and if there’s a match, the underlying web page won’t be displayed on the child’s computer.
Prevent clicks on Malicious Sites
When you perform a search on Google or other search engines, there is a probability that some of the links appearing on the search results page could be pointing to sites that host malicious or harmful content.
To make sure that your children aren’t clicking these links, what you need is Web of Trust – it’s a simple filter that analyzes web page links in the background and adds colored icons next to them so that you child knows whether visiting the underlying site is safe or not.

Web of Trust is available for both Internet Explorer & Firefox. It can scan links appearing on almost every major search engine and even web email services. You can also use the WOT online service to find the reputation rating of any website
Block Selected Websites (like IMs or Social sites)
The filtering option in OpenDNS is great for blocking an entire category of websites on your computer but if you are looking to block only selected sites (e.g. Orkut.com or MySpace.com) because your kids are too young to waste time on these sites, here’s a tip.

Run the Hostsman software (it’s a freeware for Windows) and press Ctrl+O to open the hosts file editor. Click the "Add" icon and type the URLs of all the websites that you want to block on the child’s computer. Hit Save and close the hostsman application.
None of the blocked sites will ever open in any of the browsers installed on your child’s computer unless someone manually deletes the record from the hosts file.
Turn Safe Search On forever
Google, Bing, Yahoo and most other search engines allow you to search the web (and images) in "Safe Search" mode meaning you are less likely to encounter images or web pages in search results that may not be appropriate for children.
But the only problem with this approach is that it uses cookies so if you clear the browser cache, the "safe search" preference will be lost as well.
 Luckily, you can force the "strict filtering" option in your browser even if the parent or the kid forgot to turn that option on himself.
The trick is that you open the Google search URL wherever it appears in the browser database and append "safe=active" before the "q" parameter.
For instance, you can type about:config in Firefox and change the keyword.url value to http://www.google.com/search?safe=active&q= – now any searches performed from the address bar will always show "safe" content.
Track Kids Activity on the Computer
While I don’t suggest using a keylogger program to monitor each and every word that your kid is typing, you may want to explore programs like Rescue Time or Slife as they will give you a good overview of how your kids are spending time at the computer.
You get to know what sites are they visiting, how much time are they spending with IM programs, what software applications are they running more frequently and how much time do they spend on individual sites.
Create Video Games on your Windows PC with Microsoft Kodu
Posted by avnrurfriend in GENERATORS, ZEAL
Last summer, Microsoft Research released a community game cum programming environment for the Xbox 360 called Kodu. Unlike most other video games, Kodu would let players create their own video games for the Xbox without any prior knowledge of programming.
Design Games on your Windows PC


The initial version of Kodu required the Xbox 360 console but now Kodu is available as a free download for your Windows PC as well. This means you no longer need an Xbox to design games with Kodu and you can play them on just about any computer using a keyboard and mouse (or an Xbox game controller, if you have one).
The entire Kodu program is more like a video game than a programming environment. It includes several tutorials to help you quickly figure out how to create new games, or you can look at the sample games bundled with the program for new ideas.
You can easily edit any game by pressing escape, make the changes and then jump back into playing the game with your changes. Although you cannot edit every little thing inside the game, it still gives you a nice launch pad for creating simple games.
You can download Kodu for PC from fuse.microsoft.com/kodu. Additionally, the graphics settings can be turned down to allow it to run on a computer with lower resources. Kodu requires .NET 3.5 and the XNA framework 3.1 to run -- if you don’t have them, the Kodu installer will automatically download and install them for you.
In this CES video, a 12-year old girl is making a computer game with Kodu live on-stage -- she’s using Xbox but you can use a Windows PC as well with Kodu.
Scratch from the MIT Media Labs is another popular tool that you may use to create interactive games and animated stories on your Mac OS X and Windows machine.
Firefox Tip: Save Multiple Web Pages as MHT Files In One Go!
Posted by avnrurfriend in ZEAL

The format is supported on IE, Opera, Microsoft Word, OneNote, etc. and comes handy if you need to attach an entire web page as an email attachment.
Now your favorite browser Firefox 3 cannot export web pages to MHT format by default but there’s an excellent add-in called UnMHT that makes MHT support in Firefox better an IE and Opera.
 With Un-MHT, you can read any MHT files in Firefox just like any other HTML or text page.
Other than viewing MHT files, this add-in adds a "Save all tabs as MHT" feature that lets you save the current window or all open websites as separate MHT files in one go taking the file name from title of the web pages.

Considering that Windows Desktop Search can index content stored in .mht files, this may prove very useful if you need to save your work and close the browser.
Make Beautiful Photo Collages from your Pictures with Microsoft AutoCollage
Posted by avnrurfriend in GENERATORS, ZEAL
Though you can make collages with picasa, the results are no match for what you’ll get from AutoCollage 2008, a new collage making software from Microsoft that also includes face detection.
Using AutoCollage 2008 is so easy – just pick an image folder that has 7 or more images and the program will do the rest. See this 30 second video screencast to know how all this works:
The most impressive part of AutoCollage is the built-in face detection that will prevent faces in the photographs from being obscured in the final collage. During my test with some 9 pictures, AutoCollage could successfully detect the face in every picture.
Microsoft AutoCollage is available for Vista & XP but there’s a downside – the software isn’t free ($20) and the 30-day trial will add a very prominent watermark at the bottom of your image collages.
How to Capture Videos of Google Earth
Posted by avnrurfriend in ZEAL on Friday, June 25, 2010
This is a short video animation captured using the free version of Google Earth.
The video in high-resolution (720p HD) and the animation plays very smoothly but before I share the actual software that I used to record this movie clip, please read the guidelines for using content from Google Earth and Google Maps:
[Offline use] If your proposed offline use of Google Maps or Google Earth is limited in scope, the concept of ‘fair use’ may apply
[Online use] You do not need permission to create and display video created from Google Maps or Google Earth in a video, whether hosted on your own site or through a service such as YouTube. You must purchase a copy of Google Earth Pro if exporting motion video, because screen capturing is not allowed.
If your usage meets the ‘fair use’ criteria, you can use the free Wegame client to record movies of Google Earth on your Windows machine. Wegame, a popular tool for recording video games, was recently updated and it now supports full-screen recording at 30 frames-per-second for smooth video.
Unlike most other screencasting software where you just hit the Record hotkey to start recording, it may take a couple of tries for you to get comfortable with the Wegame capture process.

Launch the Wegame client and connect with your online account – you don’t have to upload your movies online but you still need to login for the software to work.
Then launch Google Earth and you’ll see a green square box inside the Earth program. Hit F6 and the square should disappear meaning the animations are getting recorded. Hit F6 to stop the capture and the recorded video will get saved in your My Documents folder.
If you are recording Google Earth animations on a slow machine, try lowering the frame rate to 15 or 20 and also switch to Half-screen recording. The video is saved in Windows Media format that you can play in almost every media player
How To Record Movies of Video Games on the Computer
Posted by avnrurfriend in ZEAL
Jessica is looking for a game recorder software to help him capture movies of PC games (with sound) that he can upload to YouTube Videos. The software should also save still screenshots of gaming scenes.
While you can record online Flash games or DOS games using any screencasting software, the situation gets a bit tricky when playing computer games that use DirectX 3D or OpenGL because they render only a blank footage with regular screen capture programs.
Fortunately, here are some good in-game video recording software that will record motion video in the background while you are playing your favorite PC game. Most of them support still image captures as well:
 1. WeGame.com - Though this is a place for uploading screencasts of video games but they also provide a free Windows software for recording games on the computer. Just start the software, launch your game and hit record.
Wegame is absolutely free and supports Halo, World of Warcraft, Ages of Empire, Half Life, Grand Theft Auto, Wolfenstein, America’s Army and most other popular games.
 2. FRAPS – This is probably the best option for recording movies of video game but costs a few bucks. FRAPS saves the video game into AVI format so the recording is smooth as the movie is not getting compressed at the time of recording. You can reduce the video size with VirtualDub or Windows Media Encoder before uploading to YouTube.
FRAPS can record still screenshots or full game movies. Just press F9 to start or pause the recording. You also FRAPS to record Google Earth movies like the one . The free version will however add a watermark to your game movies.
 3. Taksi – Taksi is game recording software similar to FRAPS but it is open source and free. Taksi can capture game screenshots or video clips of running games but without audio.
Taksi also lets you capture gaming sessions in full screen mode with hotkeys.
4. Game Cam – This is another free software for making movies of your favorite games on Windows. It will automatically search for games installed on your computer and will create an individual recording profile of every game. Game Cam can capture game screen shots, videos in AVI as well as audio.
Tips for Recording Computer Games
Recording games will slow down your computer so try to record at a lower frame rate and stop all non-essential processes like spyware, anti-virus and other running software. Also consider lowering the desktop screen resolution for smooth recordings of game videos.
YouTube will resize videos to 320×240 so maintain the same 4:3 aspect ratio of the game screen before hitting the record button.
Finally, if you have to capture only a small duration video clip or just a quick game screenshot, SnagIT will do the trick since it supports DirectX input. You may have to turn off hardware acceleration during the recording process.
One Good Reason to Allow Pop-up Windows in your Browser
Posted by avnrurfriend in ZEAL
Pop-up windows are considered evil as they open on your screen without asking and can sometimes lead you to annoying websites.
That explains why most browsers now block pop-ups by default but here’s one good reason why you may want to temporarily disable that blocker and allow pop-ups.
Stewart Smith has created an highly addictive and fun version of the Pong game using nothing but pop-up windows while your entire desktop becomes the playing table.
You can either play the game with the computer or invite a friend and both of you can use the same keyboard to control your racquets. You play with Up & Down arrows while he uses the A & Z keys on the other side to move the racquet up or down.
Browser Pong is done in HTML5 and you may therefore want to use Firefox or Chrome while playing pong.Give PowerPoint Presentations with pptPlex and Impress Audience
Posted by avnrurfriend in ZEAL
Imagine if you could arrange all slides from a PowerPoint presentation onto a large canvas and then use pan and zoom controls to navigate from one slide to another.

This unique presentation style will leave any audience impressed and you can achieve it very easily with pptPlex, a free add-in for PowerPoint 2007 released at Office Labs.
When you run a regular PowerPoint slide-show, slides move in a linear horizontal format but with pptPlex, slides can be placed anywhere on the canvas. The add-in will automatically install a nice set of navigation templates through you could easily create your own as well.

You may also think of pptPlex as a version of Deep Zoom Composer made for PowerPoint 2007. Check this screencast demo of pptPlex.
Connect other Office Documents with PowerPoint
With pptPlex, you can insert live content from other Office documents in your PowerPoint presentations.
For instance, if you insert an Excel spreadsheet or a Word document in the PowerPoint slide, their content will be displayed live at the time of presentation. So even if the source document has changed, your presentation will always reflect the updated data.

The only downside is that you require Office 2007 at the time of presentation for this to work.
Insert Live Web Pages in your PowerPoint Presentations
Posted by avnrurfriend in ZEAL
You are giving a PowerPoint Presentation on "How to Google Effectively" to a live audience and there’s a slide in your PowerPoint deck where you need to demonstrate certain Google tricks inside the web browser.
So you minimize the slideshow, open your browser, type google.com and wait for the website to load. Once you are done with the Google demo, you bring the PPT slideshow to the foreground and resume the presentation.
There are way too many steps involved so wouldn’t it be great if you could simply embed the Google website into your slideshow without breaking the flow of presentation?

Enter LiveWeb – it’s a free add-in for PowerPoint (all versions) that lets you display web pages live in your PowerPoint slides.
In fact, LiveWeb is like embedding a full browser in your PowerPoint presentation because you can interact with web pages as if they were opened in a real browser – all the links on web pages stay intact and live.

Live Web uses a wizard based approach to insert websites into PowerPoint slides – you type a list of URL(s) and their relative position on the slide (most common is centered layout). Live Web will then insert new slides each corresponding to your different URLs.
And not just websites, you could embed dynamic web graphic into PowerPoint with Live Web. Examples include a Google Trends chart or the Dow Jones index graph.
How to Insert YouTube Videos in PowerPoint Presentations
Posted by avnrurfriend in ZEAL
Before you embed YouTube videos in PowerPoint slides, always think of the medium(s) you’ll use to deliver that presentation.

Tutorial: How to embed YouTube Videos in PowerPoint
It’s not uncommon to see presenters in conferences struggling to get the video right thus breaking the entire rhythm of their presentation. The problem could be due to poor Internet connectivity or computer missing the right codecs or something else.
Now you can easily save yourself from getting into such embarrassing situations by planning ahead. Will you be presenting to a live audience in a Wi-fi enabled conference room with good Internet speed or are there any chances that you may have to deliver the presentation video in an offline environment (like a classroom)?
The reason I asked this is because each situation requires a different approach. Let’s see how we tackle each of them:
Embed YouTube Videos Directly into PowerPoint
This is the easiest approach and recommended if are sure that the presentation venue will have great connectivity. Download the YouTube Wizard plug-in from skp.mvps.org and upon installation, this will add a new "Insert YouTube Video" command to your PowerPoint Toolbar.
Insert YouTube videos to your PowerPoint presentations from the menu
You simply have to type the URL of the YouTube video and follow the wizard to add the YouTube video player in your current slide. You can resize as well as reposition the player anywhere on the slide.
Play YouTube Videos in PowerPoint without Internet
While the above solution works great, the only problem is that it streams live videos so an internet connection is required to playback the video during the slideshow. If you plan to deliver a presentation without internet, take the following approach.
First download the YouTube video locally in either Windows Media or AVI format since PowerPoint doesn’t understand the default FLV or MP4 formats of YouTube.
Add YouTube videos for offline PowerPoint Presentations
You can either use Zamzar.com or MediaConverter.org to save any YouTube video as an AVI file – I prefer Media Converter since it supports in-browser conversion while Zamzar requires your email addressing where they send the link to converted video.
Related Trick: Find High Resolution Video Clips on YouTube
Once the video is saved as an AVI or WMV file on your computer, go to Insert –> Movie –> "Movie from file" to put the YouTube video in the current slide.
Get Videos from Google Docs into PowerPoint
Now consider another possible case – you spent lot of effect preparing an elaborate presentation inside Google Docs with several YouTube clips but how do you import all this into PowerPoint.
While Google Docs does provide an "Export as PPT" option, the problem with this format is that it converts all embedded YouTube clips into static images which is something you don’t want.
Insert YouTube videos from Google Docs into PowerPoint
There’s however a simple workaround – just publish that Google Docs presentation as an HTML slideshow and then insert it like a web page in PowerPoint using the liveweb plug-in. Thus you can play YouTube clips inside PowerPoint though they are part of your Google Docs presentation.
Another advantage of this approach is that if you change any of the clip in your original Google Docs presentation, it will be reflected in the PowerPoint presentation as well.
Share Pictures Directly from your Desktop with Dekoh
Posted by avnrurfriend in ZEAL
Freelance photographer Claude Renault is looking for a tool to share pictures with friends and family directly from his computer's hard drive without uploading them on a public photo-sharing website or sending them as email attachments.
Some of you may recall PurpleNova that turns your desktop into a website - every file or folder on your computer (that you decide to share) is automatically assigned a web address and your friends can view the pictures from your computer onto their desktops. No uploads required.
 Another good alternative (to PurpleNova) for sharing photos and music from your computer is Dekoh Desktop - it runs inside your web browser (as a small Java applet) and works the same on Windows, Mac or Linux computers. [PurpleNova was Windows-only]
Getting started with Dekoh is simple. Create an account with your email address and the Dekoh software will seamlessly install in your web browser. Select the Dekoh Photos and add the picture folders that you like to share privately with your contacts.
Send them an invite via Dekoh desktop itself and they'll be able to view your photos from anywhere in the world. The pictures will stream live from your desktop so if you go offline, the sharing stops automatically.
Your friends can view the photos you shared as thumbnails, individual pictures, or in a slideshow.
 The look-n-feel of the Dekoh Desktop is pretty impressive and though I had some issues installing it on my main computer (due to conflicting JRE versions), Dekoh worked like a snap on another computer.
They have just launch another application called Dekoh Music which scans your chosen folders for MP3 audio files and and you can listen to your music collection from any other computer.
Dekoh.com | Sign Up for DekohTurn Your Home Computer into a Web Server in 2 Minutes
Posted by avnrurfriend in ZEAL
You may find this technique useful even if you are not a very tech-savvy user.
 Before getting into the actual process, let’s look at a couple of real-world situations that explain why you may want to turn your home computer into a web server.
Situation #1. Say you have music MP3s, documents and other important files on the hard drive of your home computer. If you turn this home computer into a web server, you will be able to access all these files from office or any other Internet connected machine including your mobile phone.
Situation #2. You have some personal photographs that you want to share with other family members. You can either upload these pictures online to a site like Flickr or better still, just convert the computer into a web server. Now you can connect the camera to the computer, transfer the digital pictures to some designated folder and they’ll instantly become available to your friends and family anywhere in the world.
Situation #3. You want to host a website on the internet but the web hosting jargon like FTP, DNS, etc. is way too complex for you. The workaround therefore is that you setup a web server on your home computer (it’s easy) and then host a website in seconds without spending a single penny on external web hosting services.
Now if any of the above reasons look convincing enough, here’s how you can convert your Windows, Mac or Linux PC into a web server in less than two minutes – no technical knowledge required.
Go to labs.opera.com, download the Opera Unite software and install it. Congratulations, you are now running a web server on your machine and just need another minute to configure local file folders that you want to share with others over the internet.
Here’s an illustrated screenshot of the configuration panel – nothing technical here again.

Start the Opera Web browser (yes, that’s also you web server now) and enable the Opera Unite service from the lower left corner. Now double click the File Sharing link and select the folder whose content you want to share on the web. Any file or folder inside this folder can now be accessed over the internet – you can either use a public URL or specify a password for private sharing.
The following screencast video has more detailed instructions on how to get started with Opera Unite or you may refer to the User Guide if you get stuck somewhere.
Opera Unite looks pretty useful but there are other services around that can also do pretty similar stuff. For instance, both PurpleNova and Dekoh Dekstop enable users share content on the Internet directly from the hard drive without having to upload it anywhere.
Update: It’s important to note that your computer must be in running state and also connected to the Internet for others to download files and web pages since Opera Unite streams content directly from your machine – it doesn’t upload or caches anything to its own servers. Give it a shot. [flickr]
Share Pictures, Documents, Music on the Web Without Uploading Them Anywhere
Posted by avnrurfriend in ZEAL
You use Flickr for uploading photographs, Scribd for sharing Office documents, YouTube for video files and Rapidshare or Divshare for uploading Music MP3s and other file formats including .zip and .exe.
Now that's not a bad approach but care to try something very different that would save you from the hassle of uploading stuff on the web ?
Enter Purplenova, a 3MB software that turns your computer into a virtual website. 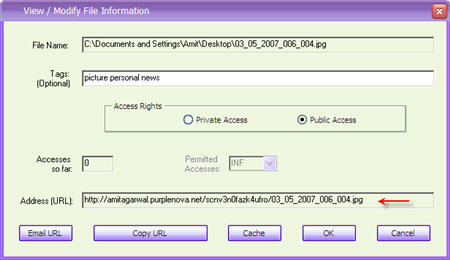
Every file or folder that you share from your computer gets a public URL. Your friends can simply type that URL in their web browser and access the file no matter how large the size is - it will be streamed directly from your computer to his/her machine.
Purplenova is like turning your computer into a web server (with an internet address) sans any complex setup. Just run the utility, choose the local files or folders that you like to share over the web and Purplenove will give you a URL for each of them that you can paste in your email or blog.
There are some interesting application of Purplenova - you can access files located on your home computer from office or vice versa. You can also listen to streaming music on another computer from your Windows Media player.
They are integrated with Google Analytics to provides you with stats about file usage. Think of Purplenova as extremely simple web hosting from your desktop with absolutely no limits on storage space or bandwidth constraints.
PurpleNova.com | Download Purplenove 3.0
Unlike screen sharing software like Yuuguu or SharedView, Purplenova does not give other remote access to your computer, it delivers files only through the web browser.
How to call your friends with their own number
Posted by avnrurfriend in ZEAL on Tuesday, June 22, 2010
This is a very simple and cool trick by which you can call your friend with their number.You can confuse your and shock your friends.This trick is just free without of any cost
Mobile hack to call your friends:
Follow the following steps
1. Go to http://www.mobivox.com and register there for free account.
2. During registration, remember to insert Victim mobile number in "Phone number" field .
Now, simply hit on "Call Now" button to call your friend with his own number.
Enjoy playing with your friends .


